At last, we've turned the corner on the season: the winter solstice, our longest night, and its fabulous lunar eclipse, have come and gone, and, in a very few days so will 2010. I photographed and photomontaged this lunar eclipse with my baby boy about seven years ago, and had hoped to repeat the exercise this week, but was flummoxed by the weather. I love this moment of the year - the world takes a breather and each day is a few minutes brighter than the last.
My sea and sand jacket is finished, and so is the Sandra Betzina Today's Fit V1036. I'm now working on yet another jacket: V7610. I'll blog them, and review them.... sometime. My sewing window is narrowing, and since next year I'll have six sewing-free months, it makes sense right now to focus more on my irrevocable deadline than on up-to-the-minute sharing.
In the spirit of the season, I'm sharing with you my collection of kolędy, Polish carols, which are the most beautiful traditional Christmas tunes in the world. Us Canadians are lucky to hear them on our national radio station CBC every year.
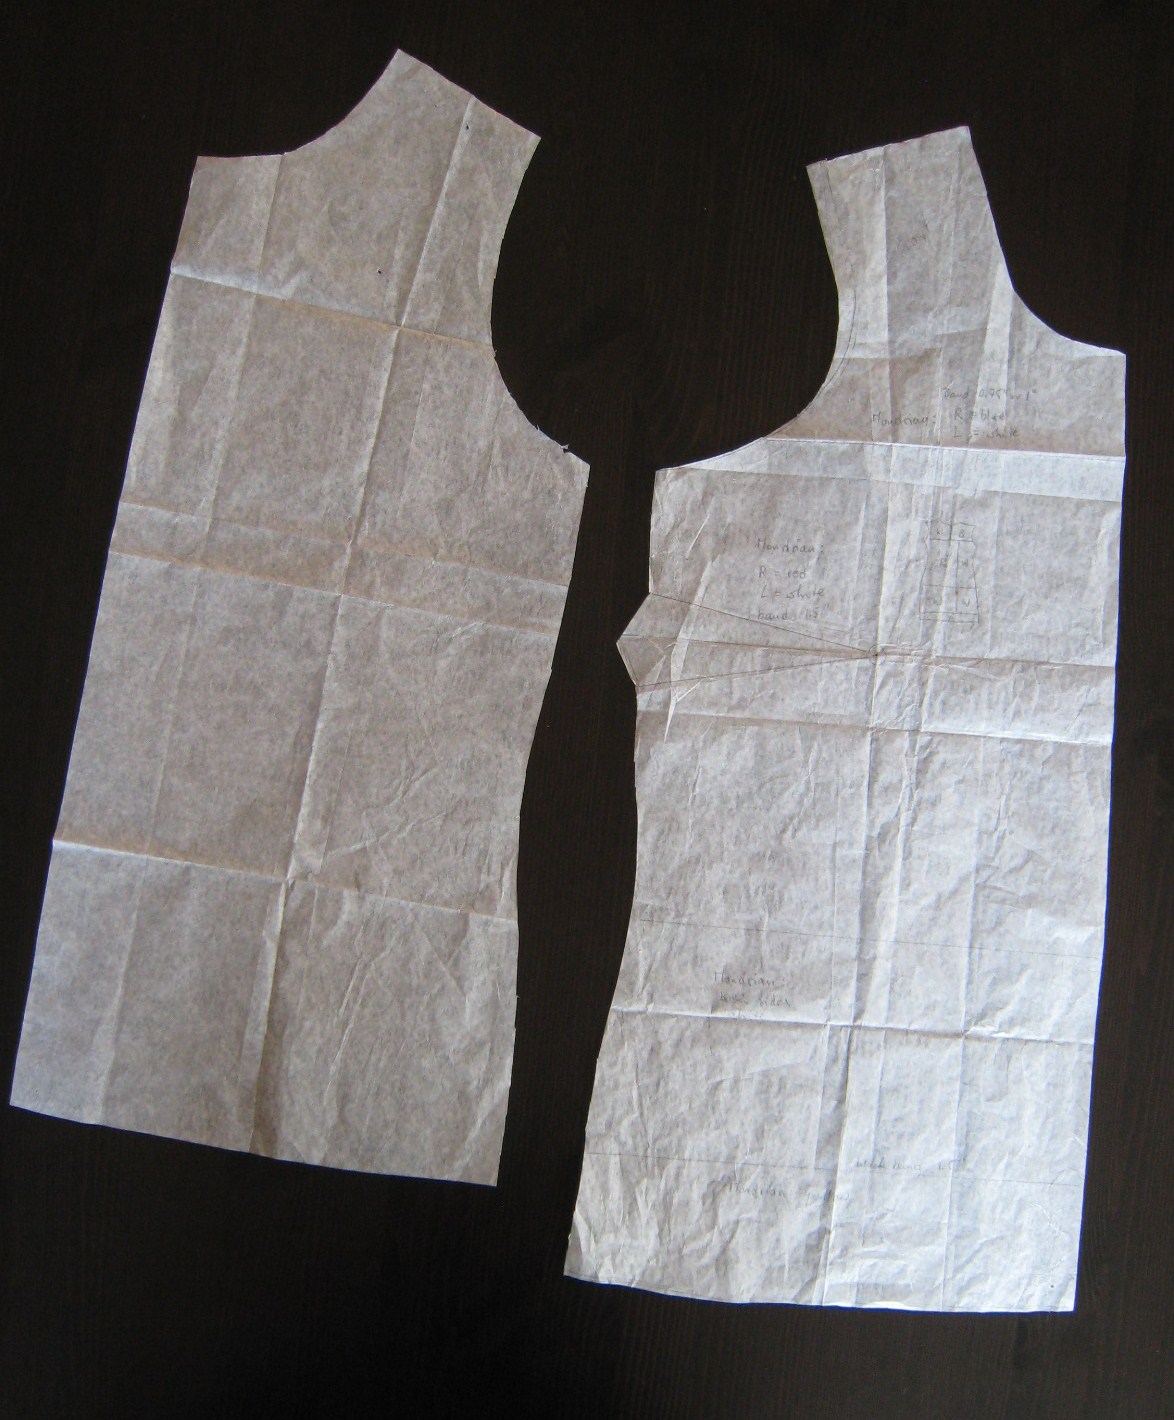
I'm working on what I call my "sky and sand" jacket. Its construction is still in progress, but very close to completion. Here's the pattern:
It's a short, double-breasted, lined jacket with a flat collar and in-seam pockets. The combination of bias sleeves and straight front intrigued me. I became even more intrigued when I saw the pattern pieces; especially this, the upper back-sleeve-side front:
This upper back+sleeve+side front piece is so counter-intuitive! The narrow part that points to upper right is the side front, while the wide piece pointing to lower right is the upper sleeve.
There is no shoulder seam - instead, the jacket has a shoulder dart. The two piece sleeve includes an under sleeve that is fitted to the body's side seam with a gusset: the scissors point to the gusset. Since it's important to make this a neat point, I basted it in, and then, after sewing, topstitched its edges onto the body pieces, to make it nice and smooth in wear.
Undersleeve gusset
The pattern's back design is rather conventional, flat and unfitted. Like the front, the back pattern piece is one with the upper sleeve. But of course I couldn't leave well enough alone: I wanted a jacket that looked as unique in the back as it does in the front. So I added a pleated centrepiece.
My added back panel at left; Vogue's original lower back and back sleeve pattern piece at right. The diagonal fold lines show my planning process, with the width of the pleat and the sewing allowance. I cut along the leftmost diagonal.
Back of the jacket, with added central panel. The collar is just draped over the jacket, not yet sewn in,
Above, hanging over a chair, is the back of the garment, with my added pleat. I cut it so that the diagonal is on-grain, and the centre forms a pleasing symmetrical design. The pleat edges are edge-stitched to keep them sharp, and will be tacked to the hem when that's completed.
I did run into a bit of a snag at one point, relating to the interfacing. Both interfaced fronts showed bubbling right where it would show the most: front row centre. And this was a quality interfacing from a very popular supplier. My solution? Below:
I sprayed the pieces with water, steamed without pressing, and peeled the interfacings off. Interestingly, the facings and other bits which were fused in an identical manner but using a different type of interfacing (from the same supplier) have absolutely no problems.
I shall re-fuse and continue as soon as the fabric pieces have dried. Still to be completed are the pockets, the collar (it's only draped on the chair right now), and then the lining. Easy-peasy!
Several of the tops I've made lately are very simply constructed, with no shoulder seam. The neckline treatment evolved as I was making them. I bound the first two, but continued to look for a simpler approach. Finally, I came up with this:
1. An asymmetrically flattened oval template for the neck opening. It's flatter at the back than at the front, and placed so its long axis is not aligned with the shoulder seam (in the absence of a seam, the shoulder fall line) but shifted towards the front. The overall circumference should be approximately the same as one's head; it'll enlarge slightly in the finishing step.
2. No binding. Instead, a line of fine stitching circumscribes the neckline about 1 cm from the cut edge. The edge is then folded over - some clipping is necessary to get the edge to fold over at the tight curves - and stitched down with two lines of very-very short stitches.
The second line is created continuously with the first, with a two stitch jog at the end of the first "circumnavigation". I'm slightly compulsive about tying off thread ends with a tailor's knot and then hiding them into seams, so even this tiny little step is a time-saver for me.
Once the neckline is finished, the flat fabric is folded again and the side seam chalked in and pinned (marked by orange pinheads) - from the right side, since it'll be a French seam.
Despite it being December, my declared month of jackets, I'm still working on sleeveless and almost-sleeveless tops. Apart from that one white shirt, I've done exactly zero long-sleeved tops as yet. My fiddling with pattern design is slowing me down, yet I can't resist. But I do now have a nice collection of linen, cotton, and silk tops, and a few lightweight poly ones too. What?! Poly?! Yes, poly! the fabric that many of us love to be so snobbish about.
Ummmm... why on earth would I want to wear polyester in +44°C?! Well, for starters, it'll be +44 only some of the time. Better reasons, though, are that:
Poly georgette - the lightweight stuff - breathes. I always check my fabrics for breathability - I call it the Lauren Bacall method:
Bogie and Bacall, what a great couple. But yeah, I simply put the fabric up to my lips and blow. If it doesn't offer any resistance - and these polys of mine certainly don't - I know I'll have a cover-up that'll let the breezes blow in and out and cool me down.
It's indestructible no matter how hot the wash water, or how often you wash it. I've heard people complain that poly stinks. But not in my experience: not if you toss it in the wash after each wearing? Nor if it's loose enough not to cling?
It's colourfast. I admit I'm a teeny bit concerned that my linen and cotton tops will turn dingy and drab after a few cycles in the wash, and I'll be left with - gasp! - a suitcase full of nothing to wear!!! Heheh, here's where the polys will hold their own!
It never wrinkles. So the gal who lives out of a box can occasionally aspire to look like a lovely Rapunzel rather than hideous Rumpled-Stiltskin.
When I was expecting my youngest, my Mom Who Sews made me a three piece outfit out of a poly like that. It consisted of a tank top, a button-down collared shirt, and a wrap skirt that, with velcro and side ties, was able to grow and then shrink right along with me. That was over a decade ago, and I have literally worn that outfit - usually as separates - to death every summer since. To death, yes, except it refuses to die. In fact, it looks as brand new today as it did the day I received it. And, because of its very simple design, it remains chic and timeless. The way it resists all wear and tear, it'll take a nuclear blast to destroy it.
That's why my money's on a few poly tops as backups if nothing else - just in case.
This latest top is a little different than the last: the side seams are curved, and there's no bottom band. Instead, I used two remnants from this and a slightly different pattern in the same colourway to make a two-sided ascot.
I'm not usually a florals type of gal, but I thought a few blue and gold blossoms will do wonders to relieve the unremitting drabness of barren desert and cheer everyone up.
Oh, and am I taking Mom's gift with me on my upcoming junket? You bet I am.
Continuing with my variations on the pleating theme, I thought to simplify the overlapping fronts plus shoulder pleats with this design:
It doesn't get much simpler, does it? Originally I wanted to have the shoulder "seam" shirred to about 10 cm/4", and to minimize the bulk in that area, made the top of the garment on a fold. There's actually no shoulder seam at all.
This fabric (an uber-lightweight silk crepe from Fashion Fabrics Club) does very well to show the construction, with its horizontal pattern theme (in flat fabric, the rivers really are perfectly horizontal). Once I saw it in the mirror like this, it became clear that shirring these lovely waves was going to be just too much. No, it would downright ruin what's already a great feature. So I left it as is.
The neckline is bound with not-quite-45-degrees bias, armholes are folded over twice, side seams frenched, and the bottom band is doubled and stitched in the ditch. Not a single raw or serged edge to be seen anywhere! The top uses practically every scrap of exactly one yard of 42" width fabric.
Edit: by request, actual measurements.
These are the finished dimensions. The raw fabric pieces were:
Main body: 79 cm/31" wide x 112cm/44" long, folded in half along the top. Because the fabric is very light and hard to cut perfectly straight, I allowed 2cm/0.75" for each double fold on the sleeves. The bottom is tapered to 56cm/22" wide. The diagonals start 21.5cm/8.5" below the fold, and that's also where diagonal seam ends. The front neckline is cut in a curve that drops it about 3.5cm/1.5" lower than the back, which is straight across.
Bottom band: a single piece of fabric, 109cm/43" x 20.5cm/8". I attached it after only one vertical/diagonal seam was sewn, and then sewed it closed in one go with the other vertical/diagonal seam.
The pants, a teeny beige-white pinstripe, are a silk-linen blend from Michael's.
We had to wait till a daytime moment while both I and my lucky charm child were home - aaaaand .... just completed the winning coin toss: ta-daaaah!
Winner (I'm not telling - you'll have to watch the video!)*, please email me (hostahead at gmail dot com) your addy, and I'll post you the pattern. Of course, you WILL make something within the week, and post it for all of us to admire, right? ;) I'm keeeeding!
Thanks to you both, Ann and Deborah, for giving me the opportunity to have this little bit of fun!
.
.
.
.
Having first explored the slicing and dicing approach to tee variability, I turned to draping.
The one-shoulder wonders from Burda's Nov. 2010 issue, though a tad impractical for everyday wear (understatement!) or even a daytime Christmas party (lots of those creeping up on many of us!), do have potential.
It occurred to me that they could easily be adapted to something a little more wearable. Especially so when you look at the pattern pieces; top 105 and dress 106:
What are they, exactly? An adaptation of a tee: one shoulder is removed above the armhole, and the other side widened sufficiently to make the shoulder seam twice as wide as normal.
It's easy enough to reproduce if you happen to have a "cut one on fold" sleeveless tee pattern piece.
I first redrew the complete front (the right half with a dashed line), then matched the lower right corner of the original half-pattern piece to the drawing and rotated it to the right so the shoulder seam was widened to twice its original width. Free-handed the neckline curve to the opposite armscye, and cut away the no-longer-needed shoulder piece (marked with X).
As a last step, after verifying that the overall width was more than sufficient, I pleated out the bust dart.
To make my tee, I cut two fronts and gathered their shoulders to the shoulder seams of my regular tee back.
I bound the entire neck seam before sewing up the sides; because the two fronts' overlap is quite high, there's absolutely no need to attach them to each other.
I made this up in a very lightweight and sheer polyester crinkle crepe, too light to be a single layered front, but perfect if doubled. The back, in "coffin clothes" fashion, is a plain single layer, but I plan to cover it with a lightweight white blouse ;) at the very least.
Overall, the effect is oh so modest. But - if you wanted to have something a little less daytime, you could duplicate a similarly double layered back, gather the shoulders some more and curve the diagonal seam a little lower. Why not even run that neckline curve below rather than above the bust?
And here, with the belt - which I made loooooong enough for sure - wrapped twice around. No doubt it'll also look better without the second belt holding up my jeans under it: you can see how it thickens up the hipline (yuk!).
You can also see just how very light is this fabric - doing a turned edge really wouldn't have worked, I fear.
Completely see through - it'll never be worn IRL without a tank or cami under it.
Evaluating it for the design, I had deliberately made the shoulder line a little dropped, but now that I see it in action, I do believe that I'd prefer those seams to sit on, not fall off, my shoulder point. Easy enough, and I already shifted them upwards by 1.5" before I put the pattern pieces away. The waist darts in the back look like they could be brought in towards centre a little as well.
I'm thinking that my second blouse will share a few similarities with this one: a cut-on collar and a waist tie. I plan to base it on Burda 105-6-2009, a pattern which I already used some time ago to make this reversible silk dupioni jacket:
This one has an absurdly dropped shoulder. You might think that this was my poor quality fitting, but not so! I cut my usual 38 and stay-stitched the necklines to ensure they don't stretch, and, if you look at the model jacket on a dummy, the dropped shoulder is quite evident. Maybe someone in the drafting department forgot to shorten the shoulder of a jacket sloper originally intended to have linebacker shoulder pads (hello, eighties)?! which of course are impossible to put into a reversible garment. Whatevah - I'll just shorten the shoulder seams so the sleeves actually reach my shoulder.
Here's what I like about this jacket: the armhole princess seams, which shift the waist tie closer to centre, from way off on the side seam. I'll change the collar-less lapels to a cut-on collar, and, instead of making it reversible, I'll -probably - add a facing as I did to the lightweight shirt above. Or, if I choose a heavier fabric, just do a facings-less hem and front edge, though I'll probably do at least an interfaced undercollar.
As before, I'm inviting you again to help me divest my sewing space of my duplicate patterns. Vogue's error, they once sent me two boxes of one order. This one is Very Easy Vogue V8436, now out of print, size 6 to 12.
I love a raglan sleeve, and, with front chest darts, this pattern has good bones. It would be ever so easy to add front &/or back waist darts to add some shaping, change the shape of the sleeve, straighten the front, add a fold-down collar.... or not. Now that I think of it, I just might use my copy for my next white blouse.
To be included in the draw (7 days from today), be a follower, and leave a comment here. That's all! Shipping's on my dime, of course.
The problem with having to make quantities of anything is that the process very quickly goes stale unless you the hobby seamst/ress/er do something to ramp up the amusement factor.
I'm still working on tees (and will be till the end of Nov), but have just about exhausted the amusement factor out of cutting them on the bias. So I translated this:
to this:
Cutting through the side dart, I separated the front into a yoke and a two-piece overlapping bodice.You can see that the new pattern includes the dart shaping in the horizontal seam. The back is treated the same way, except the horizontal seam is just that: a seam; it adds no shaping.
I originally cut the bodice diagonal with a bit of a curve, but my first result ended up a bit ripply, so the next ones are cut with the diagonal straight and on-grain. The overlapping pieces aren't attached together except at the horizontal seam.
This pattern just LOOOOVES stripes! This blue cotton knit is lightweight but has no lycra and very little give, so I treated it just like a woven. I staved off the boredom factor by making it a boatneck and adding sleeves. I decided on the sleeves after the yokes were already cut, then realized that I have to widen and deepen the sleeve cap to compensate for the fact that the tanktop armscye is cut differently than a sleeved tee's.
Remembering my near-fiascos with other fabrics with less stretch than the Jalie pattern - far less, in one case - I cut the sleeves waaaay wider, then ended up taking them in, and in, and in.... it felt a little like "guerilla sewing".
I then shifted gears to the first of my light-as-air silk crepes:
In this case, I changed the bodice to a one piece, with a box pleat in the front. Sides and shoulders are french-seamed, while the bottom is selvedge - no hemming! The armscyes and neck are serged, turned in & topstitched, and that resulted in my only error: they're a little too big, so I'm hoping a little clear elastic will snug'em up. I should've added 1 cm to them to compensate for the serge+fold!
Like your sister, your mother, your daughter, ...., yourself!
Kay and I let ourselves loose on the silk chiffons on sale at our local Fabricland yesterday, and I thought: what a perfect opportunity to try something I've been meaning to do ever since I saw the concept demonstrated.
The Keyhole Scarf!
This one is made out of a 60cm cut of silk chiffon, 140 cm selvedge to selvedge. The length offers multiple wearing possibilities:
Ankh: looped once around and through the keyhole...
Artless: long end looped back around the neck
Ascot: looped back around the neck and tucked into the loop
This is definitely on my "make for the women in my life" Christmas list. And that says a lot, because I'm not the "make stuff for people" type of crafty person AT ALL.
You already saw my little tutorial on the Möbius scarf - now pop on over to Kay's and Threads' tutorials for the Keyhole scarf.
For my first white blouse I decided to go with a Very Easy Vogue 7998 wrap design. It's now out of print. I believe I originally bought it because of its "very easy" label. I do like the lay of the collar and the big tie.
I still like the cut-on collar - it gives a lot of bang for the buck - and the casual yet dressy feel. But once I took a look at the pattern pieces and the instructions, I decided I don't like it quite so much for my fabric: a very lightweight cotton voile. I was afraid all the pulling and tugging would do short work of the fabric, and I was a bit put off by all the hemming it requires. Sooo - I redesigned the pattern a tiny bit.
I always wanted to have a shirt with square armholes, and this pattern seemed to be the perfect integrated basic shape that could be easily converted.
There's a cleverly concealed bust dart in the not-very-right angle of the front piece. I also wanted the collar and the front curved edge to have a little more body and stability, so I created a front facing. The ties will be long and skinny, and they'll attach to the logical place, the bottom of the front curve/top of straight edge, with a slit in the left side seam, to wrap all the way around the back. Hum, it's no longer a very easy pattern - just a regular one!
The nice thing is, if I decide to use the original pattern on a fabric with more body, the original lines are still perfectly visible so potentially I can return to it.
ETA: Angela asks about show-through. Indeed it's quite light, but this is intended as an over-blouse whose main purpose is to protect my skin from scorching sun and ubiquitous dust, so there'll always be a tanktop under it. If it makes it back to Canada in any shape, I'm immodest enough to dare a casual outing with a skin-tone undergarment. Ahem. Maybe. In the garden, as the proverbial rose amongst the thorns.
While I'm dithering on the white blouse, my mind is already racing ahead to next month's projects. I recently bought a few yummy yummy fabrics from Emma One Sock. Today I'll discuss only one of them:
Click to see it really up close!
Gorgeous, eh? Turquoise, dark teal, purple, and sand, with gold edging to the triangles, and all woven together in quite a striking jacquard. Cotton, I think. Washed well, and irons very well.
It has no crosswise stretch whatsoever, but it does have a (very) little lengthwise, so that's why it's hanging (on an ironing board, with a meter stick for scale) with the selvedge running horizontally. That said, the stretch is so small that it probably makes no difference - the fabric would probably work just as well with the diamonds oriented the other way.
Next month I'll want to make a jacket out of it. It'll be one of my wardrobe's anchor pieces next year, and it'll see lots of wear. How about YOU point me to a pattern you'd find suitable for this cloth, and tell me what technical challenges I'd have to overcome. Yeah, help me out. Please. I have a terrifically tough time making decisions. And the blogosphere is so full of wonderfully creative fabric artists - yes, you! So have a little fun: you get play with outré ideas, I get to do all the work :)
Here's another shot to help you visualize it in the "correct" direction.
Go for it!
ETA: After laundering, I have exactly 2 yards of this fabric, and it's 59" across.
(and thank you for your intriguing suggestions so far!)
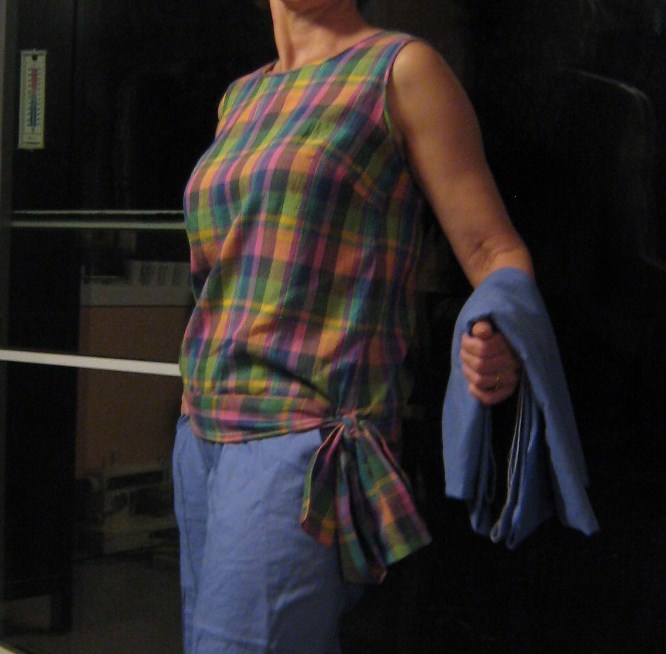
My last of this week's five tanktops is this ultra-lightweight cotton woven, finished just in time for dinner. I got so deathly bored with four consecutive iterations of vented sides that I decided it needed a great big floppy bow to offset the, um, masculine to me, except for the colour of course, thread-woven plaid pattern.
The plaid is another of my Fabric Flea Market finds, picked expressly to go with the periwinkle, aka scrubs-coloured, linen (the UFO to my left, courtesy of hubby-photographer :))). As you see above, I have a little of the periwinkle linen left over - but the fabric is narrow, and it has some discolouration at one end - I may not be able to make an overblouse of it after all.
The hem band's execution is far from perfect, I'm afraid, but let's gloss over that: no one but me will ever notice. Better to focus on the wide-leg, but perfectly well-fitted linen trousers:
These are one of my elastic waistband super-fast jobs. To make them work-worthy, I sewed front & back creases onto the legs. Yes, they're loose fitting, but still a darn good fit in the butt, no?
I do believe it's now time to turn to white blouse #1......


