Showing posts with label New Look 6516. Show all posts

14 February, 2015

Black matelasse skirt suit: it's the bomb!

Back to regular programming!  Whew - those itty bitty little booties really took me out of my comfort zone.


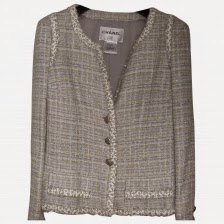
My black wool matelasse (wool-nylon blend from Mood), outfit is done, done, and done.  You already saw the blouse I made to go with it. The fabric is super interesting - not nearly as wooly as a wool bouclé, but not smooth like a rayon-poly or cotton matelasse or jacquard. It's a solid black, but the shiny parts reflect light, making them appear greyer in photos, which creates tons of texture. It looks flocked, but isn't:  that texture is created by thick wooly threads woven right in.


I chose Vogue 7975, as  I'd just "revised" my red bouclé  Chanel jacket, so the pattern was at hand.  I'd used it twice before, for the red Chanel, and also my brown-shot-with-blue-and-gold cashmere one.  This time, I was determined to see if I could finally and once for all  make it my own, turn it into a TNT straight out of the envelope.  

Hah!  Does the phrase "hoist by her own petard" (see bottom of post for the ultimate example) say anything to you?  Influenced by a friend (yes I'm looking at YOU, you know who you are!!!), I decided to make a petite alteration above the bust. It's a salutary tale of two different bodies: for her, a perfect move. For me, not so great. What it did was make the armscye tight, and I had to enlarge it back to its original size.  I'm slowly coming to the realization that the correct petite alteration for me - I do need it, since I'm a shortie - is just below the armscye, across the back to the side seam and tapering to nothing at the bust point.  N-e-e-e-e-xt time.....

Successful alterations, anyone?  I wanted a working and visible sleeve vent, so split the upper sleeve in half.  I also wondered about Claire Shaeffer's new Chanel jacket variation, V8804, in which she places the front upper sleeve on a slight bias.  So I did that too: 


I don't think that made any functional difference to the sleeve, but then again, it did no harm either. In a typical even patterned or tweedy fabric it would offer a nice bias textural variation, but in this fabric it was invisible. 

To modernize the jacket a tad and distance myself from the suspicion that I used home dec fabric (quel horreur!), I used leather-look snaps on the sleeve vents plus one at CF waistline:  

Look Ma, no buttonholes!  But quite a bit of laborious hand sewing instead.... 


The skirt is the double-vented, princess seamed V7937 (yes, again).
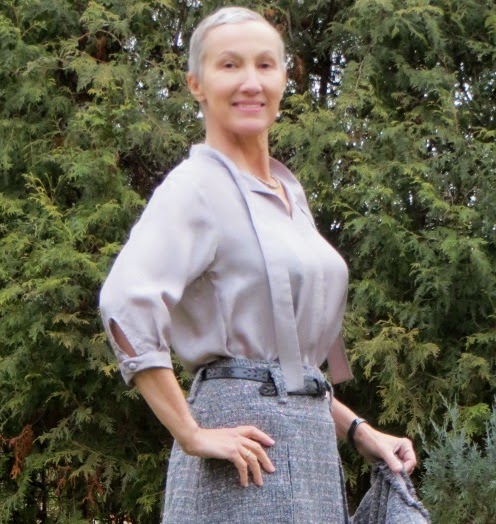
A good black skirt is a perfect basic, wearable with anything and everything.

One more thing?  Did you notice the collar on my jacket?  But.... V7975 doesn't have one.  Right.  The collar's a bit of an afterthought.  Originally, the jacket was meant to be collarless, with Chanel-like trim.  Midway through construction I decided the fabric pattern wouldn't lend itself to trim, being already very busy. So, I grabbed the collar from my fave Chanel-like pattern, New Look 6516.  And added self fabric front facings instead of lining to the edge.  Done!

All told, 2.5 yards of fabric, 3 yards of silk charmeuse (jacket lining and matching blouse), 0.75 m of black rayon lining for the skirt, all from the stash. For a change and a softer silhouette, I omitted shoulder pads this time.

And here, as promised, is the ultimate of being hoist by your own petard, the final few seconds of Dr. Strangelove (Or How I Learned to Love The Bomb), with the voice of the incomparable Dame Vera Lynn:


This clip gives you the whole "Kong Rides the Bomb" final segment of the movie, with a very young James "The Amazing Voice" Earl Jones at the controls, instantly recognizable once he speaks. 

04 December, 2014

Inspiration retrospective #1

This is just to close the loop on my previously published grey wardrobe.

To reiterate, my latest jacket was based on New Look 6516.  It looks like the classic French Cardigan Jacket aka FCJ but was constructed using a not-quite-the-oft-promoted-classic-Chanel method:  the quilting attached the fashion fabric to an underlining, while the lining was inserted using the classic "bagged lining" technique.  However...  I took some time to examine the ins and outs of a large number of genuine Chanel cardigan jackets, and discovered that quite a few of them have a standard rather than the quilted lining. So "quilted lining" isn't necessarily the defining characteristic of all Chanel cardigan jackets.  Surprised?

How is mine one different from my previous FCJ's?  Well, let's just say it's furry with a fringe on top. For the allusion and the treat of a young Hugh Jackman in his early musical theatre days, see below:


Indeed, my jacket is fringed, and fringed, and then fringed some more.  After fringing the front, neckline, and all hems, I went back and made some more fringe for the upper armscye:  call me a masochist.  But, this little decorative conceit is often observed in true Chanel jackets, as in here:


and here:


and here:


And the theme of armscye decoration is also applied to merely braided trim, as in here:


here:


and here:


BTW, all photos come from my internet's image search engine.  I've no doubt you can find more examples if you beat the bushes of the internet for a bit.

In closing, here's a little forward looking inspiration from the incomparable Maison de Couture of which we speak:


Now THAT's some Tyrolean bling!


30 November, 2014

Grey boucle/tweed wardrobe

Today was a beautiful day:  dry and, relatively speaking, warm.  No rain, no snow, temp well above freezing.  Tomorrow, I hear, it'll be quite the contrary.  So I prevailed upon the Hubs to take a few pics of my new grey wardrobe. To wit:

1. Chanel-style jacket, wool bouclé, cotton broadcloth underlining, silk twill lining and trim
2. A-line pleated skirt, wool bouclé, silk organza underlining, bemberg rayon lining
3. Blouse, out of the same silk twill as the jacket's lining and trim
4. Grey bouclé and black ponte top to work with the skirt for a two-piece dress
5. Standard lightweight wool black trousers, made long ago and a beloved wardrobe basic

Jacket:  New Look 6516

My new hair goes very well with this new outfit, doncha think? (...beats being bald....)

With bouclé top and skirt for a very unified look

Methinks the proportions are a bit top heavy. Next time, I'll shorten the jacket by at least 2 inches/5cm!

Unobstructed view
Edge stitching of  the outside  edges of the pleats
 keeps them sharp, while edge stitching of the pleats' inside
prevents them from falling open. 
Front pleats are faced with lining fabric to reduce bulk, otherwise those pleats just wouldn't behave.
 Elsewhere, the fashion fabric is folded up and edgestitched.


With matching silk blouse.  But just look at that chain: the links are so poorly closed that they slip right out of the thread!

Bouclé-ponte top: Go 4001

I went for grey-black-grey-black-grey-black. 

Love this pattern's strong princess lines. And look at the matching sleeve trim!

 Boucle side back with black ponte on either side.

Honey, does this make me look wide in the beam? 


Half-length sleeves with self-covered buttons. 

Love the belt carriers on the skirt's yoke.   Need new, skinny belt.
From a distance the blouse looks a nice pearly grey.  But actually, it's a very fine print in cool pink and black.  I like how the print size reflects the pink loops of the bouclé.


You have to be pretty close to the garments to spot the pattern: 
If you look closely, you'll note that the rows of pink are not evenly spaced,
but at 1/2" and 1" intervals. I had to remember that when cutting out the pockets,
to match them to the underlying fronts. 

The look with trousers: The slacks are from a very old Burda paper pattern.  I've tweaked them to death so they fit me no matter what, and now I don't dare try any other pattern. 


I will, of course, add to this little wardrobe, at the very least a couple more matching tops.  

Da-da-da-dat's all folks!  

23 January, 2014

Rainbow jacket: finished!

Declaring a long project completed is a very satisfying moment.

 
I see a slight imperfection in the way the chain lays on the right pocket.  A couple of stitches ought to fix that.


Below is a close-up showing details of the trim: the yarns I threaded through the chain are quite varied. There were at least four different ones in each. I tried to match the predominant surrounding colours.  Now that I see them all together, the pocket trim seems a bit too blue to me. There are blue, green, and navy threads in there, yet the photo makes it appear very monochromatic.  I know it's all a matter of personal taste, yet a purple thread might improve matters and bring it closer to the sleeve trim.


And  on the live "dummy"; as my photographer remarked, the quality of the photos is limited by the subject matter :(


The pic above shows all that's wrong with hooks:  the jacket doesn't ever really close or stay closed.  I'm not crazy about hook closures.  I'll move those hooks inward and maybe that'll suppress the center front gaposis.


In my previous post, BeccaA asked why I included structured jacket techniques (chest shield, sleeve heads and shoulder pads) in a cardigan style jacket.  Hmmm.  First, I wanted to do the Chanel style quilting to an underlining to begin with.  The fact that I had no room for 1" seam allowances aided in that decision:  the classic cardigan method simply wasn't feasible here. Then, when the sleeve issues arose, I knew that sleeve heads would be necessary, so that dictated the other "structured" touches. And I like a structured jacket.  My red version, which has no shoulder pads or chest shield, feels slouchy and (perhaps because it's a little on the big side) sloppy.   But there's one more thing:  a question of self confidence.  I just wasn't sure that I'd have the patience to do all that piecemeal hand-sewing of the lining, nor that I could make it look good enough.  Really.  As it turned out, this jacket took a lot of hand work, so I now suspect I probably could manage to produce one using only the classic cardigan jacket method and see it through to the end.  

With sewing, there's always a next time! :))


21 January, 2014

Rainbow jacket: finishing touches

Once I solved the troublesome sleeve issues, the rest came together nicely. Here are just a few more construction details:

I added sew-in hair canvas chest shields, placed on the bias.  Since the FF was quilted, it was very easy to stitch the shields onto the quilting just inside the sewing allowance.  I had a little fun using up last bits from my bobbins, thus the different thread colours. The bottom of each shield is pinked and left free.


I added a rather large patch pocket to the left inside lining.  It has a pleat at the bottom - this prevents any contents from pooching out and dragging on the jacket itself.  


I added two patch pockets to the front.  Yes, really. Can you see them? I assure you they're there.

Patch pockets on lower fronts.
They're easier to spot from above, especially when pulled open.  I double-lined them, so that pocket contents wouldn't snag on the bouclé. The lining that's attached to the body is about 1 cm or 1/2" shorter than the pocket, to make it less obvious during wear.

Now you can see the pockets very well
I added sleeve heads made out of polyester quilting batting and foam shoulder pads.  The sleeve heads were really essential to filling out those enlarged sleeve caps, and went a very long way to smoothing out most if not all of their easing imperfections. 


I still haven't added closures to the front, and am yet to add any trim. The FF is bright enough by itself - yet trimming it up is de rigeur for the classic Chanel jacket. Should I or shouldn't I? I almost convinced myself to leave well enough alone, then came across this Crimes of Fashion (love the name) jacket, all blinged up. Oh yes, a little gold for my rainbow would really make it shine.  As it happened, I had just purchased a length of chain to weigh down the hem, so I tested the look: 


On one side the chain is simply laid on top of the garment.  On the other, I threaded a couple of the bouclé threads through the links.  


It's a subtle difference, yet like the second look better, it integrates the trim with the jacket.  What say you?  


I think I've enough bits and pieces left to pull enough threads for the job:  if I trim up the sleeves and pockets as well as the front, I'll need enough to thread 2.6 meters of chain.  Won't that be a perfect make-work project for an afternoon or two!

18 January, 2014

Rainbow jacket: troubles with sleeves

Building this jacket hasn't been completely smooth sailing.  I spent a good long time on discovering, and then slowly solving, sleeve problems.


First, once sewed together and body tested, the sleeves felt much too stiff and somewhat too tight.  The solution to that was not particularly difficult:  bit by bit, without disassembling the already-made sleeves, I cut away nearly all the quilting.


By the time I finished, the only little bit of blue underlining left on each sleeve was about 5 cm at the cuff, and what had already been caught in the vertical seams.  Those two lines of what remained in the last quilting lines after the rest was pinked away, in the pic above, were also removed.  I also re-stitched the back sleeve seam about 1/4" wider, adding 1/2" to the circumference.  Not necessary, but an uncomfortable garment is one that doesn't get worn, right?

The second sleeve problem was equally unanticipated and rather harder to solve.  Call me naive, but I was under the impression that if the fabric stripe or check of the body piece is matched to the undersleeve, it'll similarly match all the way along the sides and at the sleeve cap. In theory, it should.  In this case, if I'd used the single piece sleeve of NL6516, perhaps it would have.  But I used a sleeve from V7975, and as it turned out it was too shallow.   Here's how:


At left are the back body pieces.  I numbered the armscye blue stripes: there are four of them.  At right are the sleeve pieces, and the blue stripes for the back half of the sleeve's armscye curve are also numbered: there are only three. The fourth stripe needed for a proper fit is missing, and the sleeve cap is too flat and too short to fit in the body correctly.  Oh, I'm sure I could've stretched and strong armed it (pun intended!) into the armscye, but the stripes wouldn't have matched, it wouldn't have looked good, and it very likely wouldn't have felt good in wear.  So how did I solve this problem?  I increased the size of the sleeve cap.


I sewed a strip of fabric two blue stripes high just above stripe number two of the upper sleeve.  I had just enough small pieces of fabric left over to do that.  After that, I really winged it, tacking the sleeve in tiny little increments here and there at important match points, eventually sewing it in by hand with very small stitches, and only after it was all in to my satisfaction (not perfect, mind you, but acceptable!) I machine sewed the lot just inside the hand stitching, for security.  You can just see that horizontal seam in the sleeve above, it's in the purple-magenta stripe.


 After many days, the sleeves are finally in. I have learned my lesson!
I free-handed the cap increase in the lining, and pleated rather than eased the cap into the lining body.  I always pleat out the sleeve cap excess in my linings - it's easy, quick, and comes with no functional penalty.  How about you?


Here's where I diverge from the classic cardigan jacket construction: the lining is a standard one, with an ease pleat in the back and one side seam left open, and it'll be "bagged" into the jacket.