For my second garment of 2014 I turned to a lovely little piece of colourful wool
acquired a couple of years ago at Ottawa's fall Fabric Flea Market. With its yellow, orange, red, light blue, violet, and navy, all it lacks is a bit of true green to make it a little piece of rainbow, and it shimmers like it, too. The piece was small, so when I got it I was probably thinking of a skirt; but when I laid it out, I thought, well, it just might be enough for a little jacket at that. A rainbow
sort of little jacket.
The piece was really small for a jacket: 42" wide by 53" long (110 x 135 cm). That's too small to make anything with a collar or facing. Above, the two patterns lying in front of the little length of what is actually a very yummy and cheerful piece of wool hint at the direction I decided to take: a "Chanel-style", aka, "French cardigan" jacket. The upside of this kind is that it's lined to the edge: what you see is all you need, in terms of the fashion fabric. The downside is that, should you decide to follow the classic method, it's, ahem, just a tad time consuming.
Most of the time, to make the C-style jacket people choose either
V7975 (at right in the photo above) or
V8259 (the Claire Shaeffer's custom couture collection, reviewed on Pattern Review but no longer available for sale from Vogue). Both have shoulder princess seams, but V7975 has a two-piece sleeve while V8259 has the classic vented three-piece sleeve, plus very detailed construction instructions.
Way back when, four years ago almost to the day, as part of my participation in "
Go Chanel or Go Home", I made a
very red boucle version using V7975. Live pics are linked via my pattern review
here, though if you're not a member you likely won't be able to see them, as non-members are limited to only the past 6 months of reviews. But they're also on the blog
here.
So, how did that early red version stand the test of time? The jacket itself, pretty well, except.... The hooks I picked were of such appallingly bad quality that two broke off almost immediately.
I replaced them with a separating gold-coloured zipper that matches the exposed zipper of the skirt. I still wear the jacket, usually with black slacks, although it really feels at least a size too big now - I probably made it a bit too big to begin with, and have dropped a size or two since. I considered unpicking the hem and taking it in, but my husband - aka the critical eye and voice of reason - objected, saying that there's nothing wrong with a loose-fitting jacket. He's right, right? The matching red boucle skirt, I almost never wear. Too much red all at once, I think.
Anyway, back to the project at hand. Over time, I discovered that armscye princess patterns tend to yield a better fit for me than the shoulder princess. Therefore, for this version I turned to
New Look 6516, a pattern I'd used very long ago for a jacket I still love though it was an early and very flawed creation; despite that it's one that fits me better than any other I've made.
To cut to the chase, I tested the possibilities by laying pattern pieces on the folded fabric, then cut out underlining pieces out of lightweight cotton broadcloth, laid them out, and basted them onto the fabric. Of course, with the very obvious check pattern, the aim was to have the lines match up across the body and sleeves.
 |
| Cotton quilting/underlining, basted onto fashion fabric. |
Above's the layout. The body pieces weren't difficult to place - basically, all body hems were placed on a blue check stripe and that was that. Matching the sleeves was a bit trickier, and, I thought, as long as I match the undersleeve check to the side seam check, all would be well. Right? Well... yes... almost right. More on that later.
One little thing about NL6516 is that it has a single-piece "tube" sleeve. A tube sleeve would not have fit on this measly little scrap of fabric. This is counter-intuitive, I know - a single-piece item should fit into a smaller area than two pieces - but in this case, the sleeve pieces had to share real estate with side back body pieces, and the ONLY way to make them play nice was to use a two-piece sleeve. Which I did, using the sleeve of V7975.
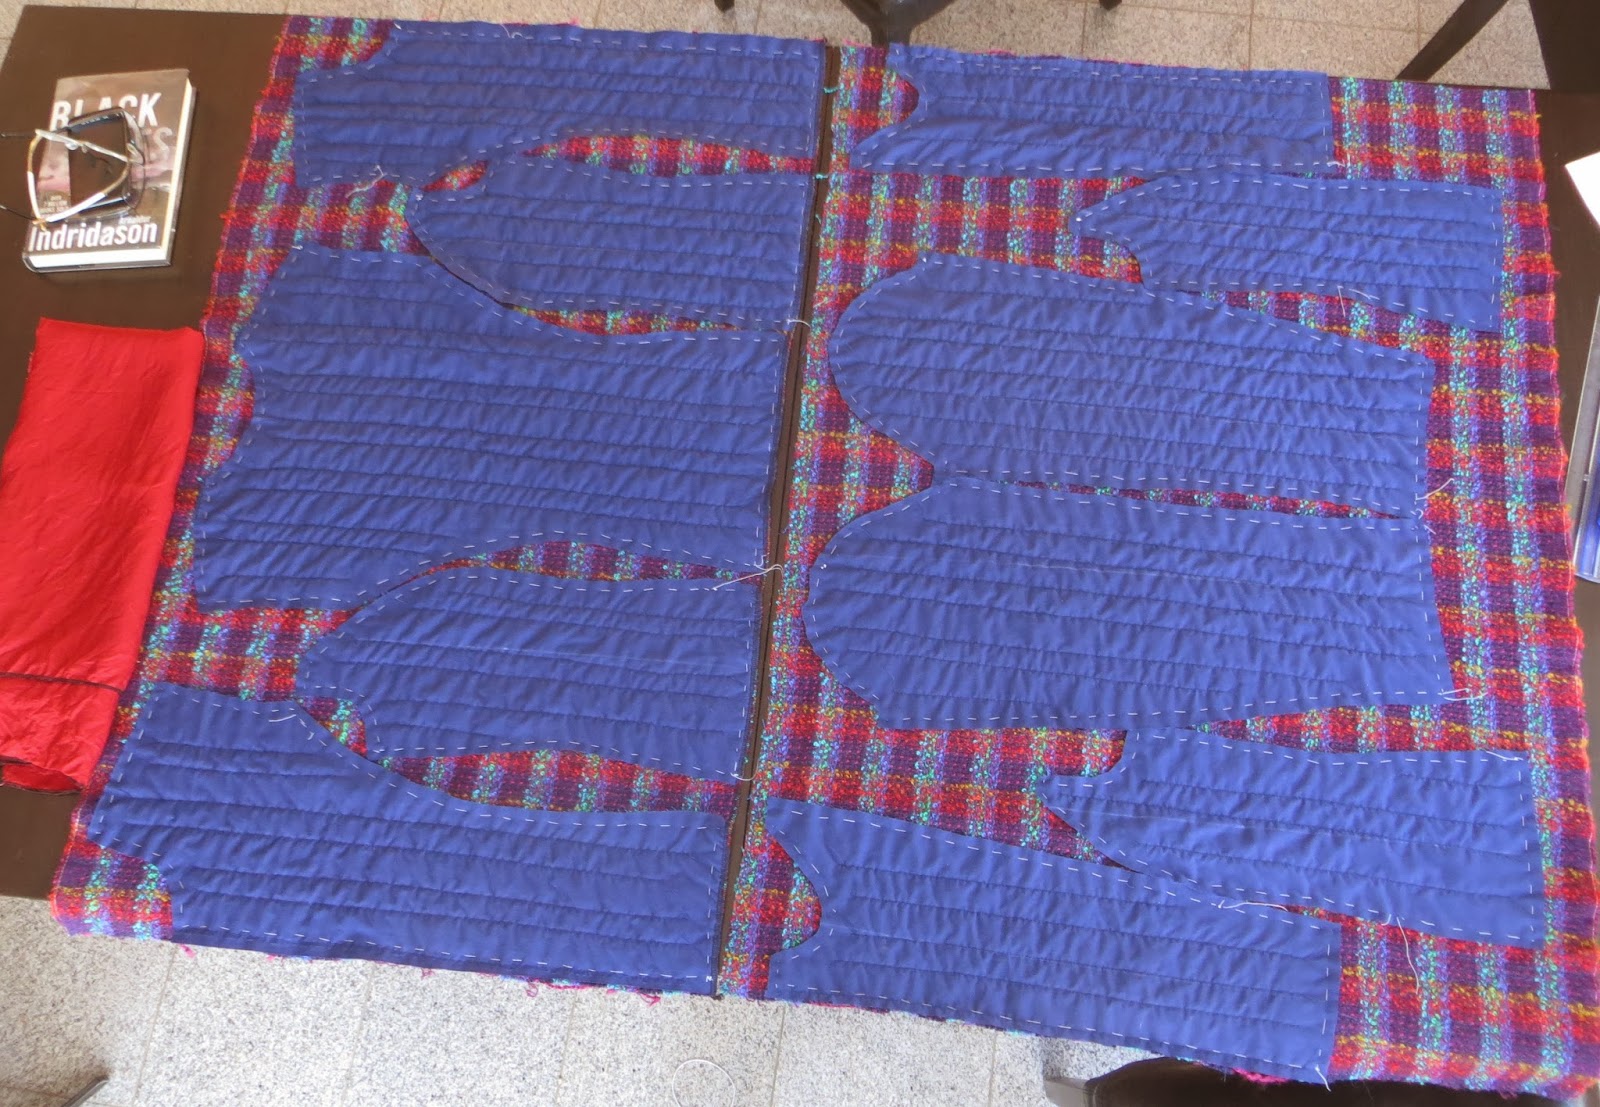
In the Chanel construction technique, one is advised to cut out the FF (fashion fabric) pieces with 1" seam allowances before quilting, since bouclé can be of a very loose weave. Obviously, such allowances were not within any realm of possibility here, so, to make things easier to handle under the machine needle, I cut the piece in half just below the hem line of the body pieces to the right, and quilted everything without cutting it all up into all the individual pattern pieces.
So far so good? Yea. The red bemberg lining at left is what I picked to go with it; I'd thought of navy blue originally, but a good match wasn't available at the store, and my second attempt at dyeing the light grey lining I'd used for the navy velvet jacket failed utterly. [And I think I know why: it turns out that my mystery grey lining is acetate, a type of cellulose-based man-made fabric that's sufficiently different from rayon that dyeing it is not as straightforward. I dyed it a nice dark blue, then washed and dried it: it returned to light grey. Live and learn....].
After the quilting, I placed the tissue pattern piece on each quilted piece, adjusted orientation to match its lateral (left/right) mate, cut it out, and immediately serged all edges. Probably a bit of overkill as this particular bouclé wasn't especially ravelly, but it safeguarded every little millimeter I had: better safe than sorry!
Here's the result, ready for assembly:
Above, you can see that the body pieces are pattern-matched with respect to the hem line. The undersleeve placed at the centre is matched to the side seam lines of side front & side back.
And the top sleeve pieces have their horizontal stripes matched to the stripes of the under sleeves.
Yea. I do believe I'm going to get a jacket out of this little scrap of wool!!!!


