19 November, 2014

The Ch*anel tweed skirt

With the grey boucle jacket all but finished - except for the hooks and eyes along its front opening - I turned my attention to making a matching skirt that, once completed, will give me a work-worthy little suit.

If you've ever given a little thought to Chanel's overall look and feel you might notice that Karl likes the A-line silhouette.  Just look at these:

 I found all these examples by googling "Chanel skirt".  There are lots of others, many with stratospherically high, lap-dancing-only hems, so I picked out just those that I thought could easily be translateable to real life scenarios.
 ....and in pretty sedate colours, too.
 A little air conditioning between the thighs is very nicely offset here by a giant let's keep my ears warm-and-toasty collar.  The overall silhouette is great, and I like how the thick turned-up cuffs offer a stark contrast to the model's delicate wrists.  She looks like a fragile little shore bird safely coccooned in a cozy warm blanket.
 This one is very fierce. And comfortable at the same time.
Although I'm not crazy about the colour and the armscyes look huge on the model, the skirt shape makes my point very nicely.


I've made my point? Indeed. So you won't be surprised to learn that I decided on an A-line skirt for this outfit. For the pattern, I turned to New Look 6511.  Unfortunately this pattern is no longer in print, but I did see it's on offer on etsy today.


Several years ago I had made the midi version view A of this pattern in an olive coloured ultra-suede. This time, I thought the short pleated skirt - view D - was giving off just the Ch*anel vibe I was looking for. I was particularly encouraged by the fact that it's shown in a boucle or tweed in the picture. Yesssss!

I cut a straight size 12, but upon fitting just the yokes found I had to take at least 5/8" off each side of both front and back. Later, after the skirt panels were attached to the yoke, I took out a big wedge out of the centre of the back yoke.  Interestingly, this is exactly the same alteration I did to the back yoke of my view A version.

I interfaced the yokes with a fusible, and that made them nice and smooth while maximizing their stability.  The skirt panels, however, are quilted to a silk organza underlining. It took a lot of basting at fairly narrow (3-4 cm) intervals, but  I'm getting reconciled to these time consuming tricks, and with good reason:  I had used silk organza underlining in a skirt once before, and very much like how it looks and wears.  A lesson well learned.

Before it got too dark to sew, I completed the outer shell:

 Inside front:  the difference between the interfaced yoke and organza-underlined lower panels is clear.  The front has two wide box pleats.
 Inside back:  there's a big difference between my butt and my waist, so the back yoke needed to be severely narrowed at the top.  The lower back is made of three flaring panels.
Front:  these box pleats make it really really cute.  The edges are basted at the  moment; they'll  be edge-stitched once the skirt is hemmed. The  zipper is set into the left side.  Of course you can't see it:  it's invisible!


Tomorrow morning I'll burrow into my stash for a thin, lightweight grey wool for the hem facing.  A facing seems like the best solution for those box pleats, as the tweed is quite thick and I'm sure would prove very troublesome when folded upon itself so many times.   

11 November, 2014

Making a fringed trim

So.  First, to answer Ann's gentle query of last post, I've been AWOL for most of the year because of the big C.  It's been quite a ride:  a year of various chemo regimens, then high dose (aka "killer" aka "apocalyptic") chemo immediately followed by a bone marrow transplant, and lastly, a month of radiation.  Unexpected detours aside, the treatments are finally over (hah, says the skeptic, for now), and I'm still standing.  So, since it looks like I'll be around to have a bit of fun in the near future at least, I decided to celebrate by - what else?! making myself a new jacket.  Ta-da!

For this one, I used the grey/pink/blue wool boucle I described way back in March 2012 under "Anatomy of a boucle".  It's truly a beautiful fabric, and of course it begged to become a Ch*anel or Little French Jacket.

I decided to use the same pattern, New Look 6516, and technique (quilting an underlining and sewing a regular lining) as I did for my Rainbow Jacket.  I'm promising myself that one day I'll make a LFJ using the classic quilted lining method, but that day hasn't yet come.  To tell the truth, I like a loose lining because it floats free of the fashion fabric, thereby adding a layer of air and thus making a warmer garment.  Especially in wool with a silk lining, for a winter jacket.  Along those lines, I'm rationalizing that a cotton or some other non-wool tweed or boucle, paired with a quilted bemberg rayon lining would be a very fine idea for a summer garment.

To make this one a little different from my previous LFJ's, I opted for a fringed trim.  We-heh-helll. Talk about a make-work project.  Separating these curly, tightly interwoven fibres was a major PITA. I thought I'd die of tedium and boredom.... but as the Chinese proverb says, a journey of a thousand leagues begins with one step.  Hence the trim-making process:

At the top we have a me-made ribbon:  it's made from a silk twill that's also destined to become the jacket's lining plus a matching top.  The ribbon strips were cut on the bias, sewed wrong sides together, and pressed so the seam is concealed underneath.  Since the ribbon will be sewn down on top of the fringe (as shown above), I saved myself the effort of turning all those tiny narrow tubes inside out.  The top two fringes are already trimmed; the third is not. The fourth strip from the top is in the process of being fringed.  Each of these fringe strips is made up of two bias strips of the fashion fabric, laid on top of each other and sewed together down the middle, as in the second strip from the bottom. The bottom strip is just a singleton - a spare.  I used the blunt end of the largest darning needle I could find in my needle collection to separate those pesky curly fibres:  YAWN!

Here's a closeup of the fringes in progress:


...and here's an even closer closeup that shows how the silk ribbon looks just lying on top of the fringe.  


To be honest, I'd have used a manufactured trim if I'd been able to find one in the correct (narrow) size and matching pink colour.  But these criteria couldn't be met in my little town - so the me-made ribbon is the only solution, otherwise the jacket would've become a UFO till my next trip to NY NY. I'm just not willing to wait that long. 

The jacket's coming along.  The outer body, with its fine cotton broadcloth underlining quilted on, is already constructed, and the pockets - one big and one little on each side - are already attached.  Sleeve trim is only basted on at the moment:


I made some effort to match the pink stripes on the pockets to those on the jacket itself.  And, despite the mind-numbing tedium of making them, I really, really like these fuzzy grey caterpillars. They're whimsical and feminine.  I'll also be adding fringe around the neckline and hem, and down both sides of the front opening.

02 November, 2014

Baby girl got married

Although weddings of one's children are - understandably - rare highlights of life, rest assured I wouldn't be blogging about this one if it wasn't sewing related.  In the event, it was not so much a wedding but a process - never have I been so intimately involved, for months and months and months, in someone else's big day, and, having only this one daughter, I never expect to be so again. In comparison with hers, even my own weddings - yes, more than one ;) - were small and simple  affairs both in planning and execution. And though the leadup to this one consumed months of activity, it was time well spent, a real mom-daughter treat. I wouldn't have had it any other way.

What I found most interesting is hearing right from the get go what the young couple didn't want:  overwhelming formality and conventionality.  She was adamant that as a modern woman she didn't want  to look like a cupcake.  So, emphatically, no white gown, no veil, and no passel of bridesmaids in matching cocktail dresses hanging on the arms of cookie-cutter groomsmen.  She wanted a country themed wedding, with a colourful floral skirt, a simple non-matching top, and flowers in her hair.

Finding fabric for the skirt was hilariously difficult, time consuming, and ultimately unsatisfying.  We hit our local Fabricland of course, and several times at that.  I then pointed her at the various online fabric stores, and kept sending her links to various floral prints in silk, cotton, poly.... Eventually she bought a length of floral fabric on e*bay, and then had to return it because the actual colour tone was not at all like its photograph: dingy beige background instead of a clean cream coloured one.  "I am beginning to understand why women choose white for their wedding", she sighed one day after this little fiasco, "it removes the stress of having to find something you'll actually like!" Um, yes, that's definitely one way to look at it.  And this from a child of mine who's nothing if not decisive.  

Ultimately, grandma came to the rescue with an offer of a heavy embroidered gold silk she'd purchased a very long time ago on a trip to India. Mom - that's me! - made the skirt, of course: fitted to the hip and flaring nicely below, very simple out of four identical panels, a waistband with elastic in the back to snug it up to the waist, invisible CB zipper, lined with cream bemberg with lace along the hem.  I offered to make her a matching shrug out of the remnant, but my little bride-to-be declined the offer.

We also had a couple of marathon weekends of hemming lots and lots of white tablecloths and gazillions of floral napkins:


On her own time, she made hundreds of yards of lace triangle bunting that  decorated the ceremony venue:


And then, I made myself a little silk dress. The silk, a green-tan paisley charmeuse-chiffon with metallic gold threads, came out of my stash.  The pattern was Burda magazine 12-2008-110 with a pleated front neckline, that I'd used once before.  This time, I adapted it slightly for this very lightweight fabric by widening the skirt hem by about 50 cm to make it flowy; in the original pattern, the skirt is a straight pencil one.  I also had enough fabric to make a very large matching headscarf that I wore in lieu of hair under a large, wide-brimmed hat.  I was going to line it - honest! then, just as I was about to cut into the lining fabric, got a whisper of a memory niggle that I might just have a full length slip that might do instead.  Righty-oh!  Indeed, I had made a white silk charmeuse slip so long ago it was all but forgotten.  So, I wore that under the dress, and didn't have to line it at all. 

I don't have a full length shot - yet...
All in all, it was a beautiful, memorable weekend, and a great time was had by all.  


19 February, 2014

Pattern alteration 1: from dress slacks to yoga pants

I don't know about you all, but, when it comes to making new stuff, I always prefer to attempt a rework of a pattern I already have.  A pattern you love, you ask? well, let's say, "....one I know well enough to use repeatedly".  Trousers aka pants or slacks in North America, are one of the items for which I'm not keen on rediscovering the wheel.  In the years since I've started sewing, I've relied on three trouser patterns:

Burda 8283, an envelope pattern (in fact, it's one of my first pattern purchases)
The much-loved by many Jalie jeans
Jalie semi-fitted slacks.

That is not to say that I don't have a whole bunch of other trouser patterns in my envelope collection, not mentioning Burda magazine ones, of course.  I just haven't cracked them open.  Are you rolling your eyes? If not, you're probably being kind. That's OK, really.  Yet, I see so much grief out there in the sewing blogosphere over attempts to make this or that new trouser pattern fit one's below the waist figure.  I figure (insert titter), for reliable results, might as well stick with what works.

Most of my office trousers are based on the Burda envelope.  I've worked this one into waistlines high and low, leg wide and narrow, even one-seam.

Recently, I felt the need for some simple slacks to replace a couple I spattered with paint, so, instead of looking for an appropriate pattern, of course decided to revise my old Burda standby for stretchy stuff such as fleece or the bottom weight techno-knit I grabbed when our local store carried a couple of months ago.  I've long ago adjusted the crotch curve a little by making it more L-shaped, so there was little need for alterations to the backside fit.

The Burda 8283 pattern is a semi-fitted trouser with front zipper, waistband, and a front and back dart on each side.  It has front pockets, but since I wear jackets, I feel no need for pants pockets, and have been omitting them from the get-go.  Call me lazy.

So, to make these knits fit me a little more closely than a no-stretch woven, and have them sit on my hipbones, not waist, here's what I did:

1. narrowed front and back inseam by 1" for a narrower leg
2. shortened the bottom front crotch by 1/2" - basically just cut away a little wedge at the top of the inseam
3. narrowed the front by 3/4" - that took care of the darts - I took that out of CF, not side
4. lowered the waistline by 3/4"
5. cut a waistband 90% of the needed width (with horizontal stretch), 4" wide.  The stretchiness of the fabric means that the waistband easily eases into the trouser top without pleats for a perfectly smooth fit.
6. cut the elastic 1" shorter than waistband, and closed the loop with 1" overlap (ie, elastic band is 2" shorter than waistband).  I might note here that I sew the elastic loop closed first, then wrap the waistband around it, and sew that into the trouser top.  It's faster than insertion of the elastic into a sewn waistband.
7. shortened leg length for flat shoes

That's it, folks!

Pretty simple, eh?  Notice I didn't touch the side seam at all, nor the back.  These slacks skim but do not bind, and are totally unnoticeable in wearing.  Perfect for at home wear, exercise, anything at all....


Best of all, they're super quick to make.  Above, three recent versions: heavy olive fleece for shoveling the snow at minus 20 deg C; black poly techno-knit; and lightweight navy fleece. I made these in a two-day run a short while ago.

Here's the original Burda pattern:


Not rocket science, is it?

Which brings me to one of the best nerdy mugs in my home, my fave:

Just what part of..... don't you understand?


....it's only rocket science:


Ah, NASA... say what you may, I'm a fan of its many successes.  I watched the very first footprint being stomped into the Moon, in all its speckly, grainy, black and white glory.  And camped across from Kennedy Space Center on a winter break trip with a bunch of university buddies... then showed the very same rockets and lunar rover to my youngest, in recent years.

Last year in Kabul, I volunteered with the Afghan scouting movement.  We held a Space Derby day for the kids at our base; along with the kids, I made a little elastic-band propelled rocket, and raced it with them (they won).
Afghan girl scouts making their propeller rockets. The dude at top left was my translator.
I also created a presentation for the scouts on the exploration of the solar system.  My translator worked very hard, and the kids' eyes just glittered.  And they paid attention!  One of them asked, if there's no air on the moon, how did the astronauts survive there?  An Aha! moment if ever I heard one.

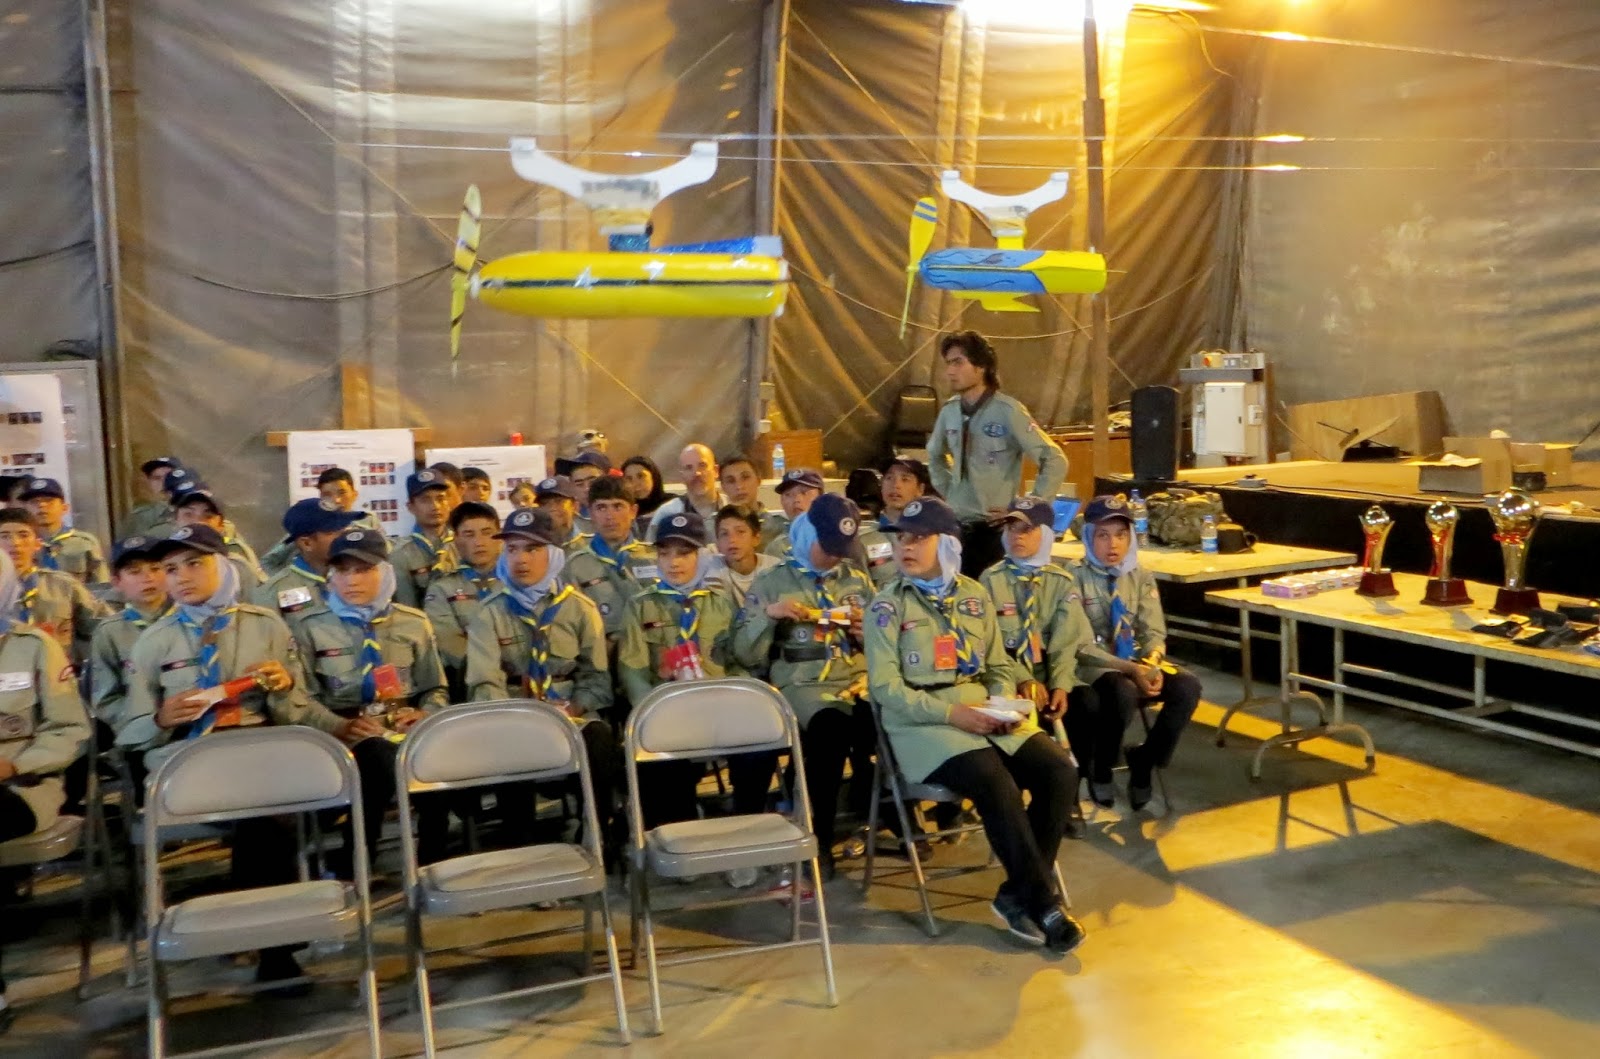
Two rockets racing on fishing line.  Note the trophies at right for fastest rocket ships.

15 February, 2014

Silk blouses: I'm on a streak!

With three Marfy 1913 tops completed and the second Burda 10-2011-128 now in progress, I'm continuing my blouse-making streak. Very useful, to be sure, as my newest three jackets desperately need coordinates. However, the pleasure of this run is starting to ebb a tad, and I'm hearing something a little different whispering at my subconscious with increasing insistence.  But whoa, I'm getting ahead of myself. To wit, the blouses:


I picked this pattern because it comes with a sewn-on scarf.  Tremendous!  I adore scarves, so this pattern is ideal for me.  


Here it is with the scarf ends tied up.  I shortened the scarf from 140 cm to about 110, because I couldn't see myself with a big bouffant bow under my chin.  No way.  Ever.  

Other than that, I cut a straight 38, raised the centre opening about 3 cm or so, shortened the sleeves ~4 cm to bracelet length, and tamed the slouchy look by shortening the shoulder line by 4 cm plus raising the armscye by 2 cm.   This blouse is unfitted, and could be made more so with the addition of bust darts and a bit of side shaping (it has none whatsoever), but the silk is lightweight and, though this isn't visible in a photo, swirls round the body nicely.  This fabric is the bit of silk jacquard I dyed recently.  It's heaven to touch and even more so to sew, not least because the jacquard weave gives it wonderful resistance to fraying.  Happy me, I have a bit more of it, and am likely to dye it a dark burgundy for another blouse. 

I also love the fact that the front slit finish is created by wide facings that also finish the front neckline and are caught in the shoulder seam.  My current effort of this pattern (once is good, twice is better, right?) is a dark, semi-transparent stretch silk chiffon, and these front facings will add some modesty assurance exactly where it's needed.  

On the Marfy 1913, third time's the charm.  I widened the neckline a touch and lowered the armscyes back to original design, and it fits just exactly as it should. 


The fabric is a whisper-light, smooth silk habotai, which is the plainest weave there is, in a neat abstract that seems to hint at florals without being flowery, in midnight blue and white. Sewing this one was a challenge:  I've been fighting static cling in it far more than any of the others - with the very cold weather, there's no moisture in the air to carry away the charge built up by handling - methinks I should refrain from sewing such light silk unless it's +35C with 90% humidity?! 

Or, how about sewing in the sauna?!


;)